Check out my listings on eBay
This post is part 2 of some tips I've learned about shipping for eBay along the way. For part 1, please click here. This process uses a printer to print your postage yourself, which is going to be more efficient than purchasing postage at the post office.
Assuming you've already packed and weighed your items and properly set up shipping costs, actual shipping should be a breeze. Needless to say, don't ship items until they have been paid for. If the buyer pays with a check, I usually wait until it clears before shipping. Of course, it's up to you whether or not you decide to take checks.
The first thing I do is print a packing slip for each paid order. You may skip this step, but I'll share it just in case you decide to do it. If you are trying to build a business on eBay, it can push your professionalism up a notch. After trying a few different methods, I've found that I prefer to go to My eBay (upper right)/Awaiting Shipment (list on left). There, you can select all the items that are awaiting shipment by checking the box in the first column, then clicking Shipping Action/Print shipping labels or invoices. Next, under Invoice and Address Labels, select Invoice/Packing Slip. Finally, eBay will open a print preview window where you can then print using your browser's menu.
Next, I use my packing slips to pick the items that have been paid for, match the packing slips with the packages, and bring the packages over to my computer area.
Thoughts on software used to print postage: right now, if I only have one item, I'll usually do it through PayPal. PayPal has a multiple order processor, but I find it cumbersome to use in comparison to the Stamps.com software. So if I have multiple orders to send, I'll use my Stamps.com desktop software.
You should already have the weights on your items, but make sure you do any final taping or rubber banding of the inside packaging if applicable. From there, you'll use the software of your choice to print your labels. I usually double check the weight (and package size, if applicable) with the software before printing the labels. You can choose to print your labels on a 2-per-page label or on regular paper. Obviously, you'll tape the label on if you use paper. Labels can be a good time-saving investment. If you use labels and are printing from PayPal, it prints a confirmation on the 2nd part of the sheet. To avoid wasting a label, you can probably just fold the paper in half so that it only prints on one of the labels. You'll lose your confirmation this way. I find the confirmation unnecessary since the information is electronically in so many different places.
Hopefully that will help you refine your shipping process. Any suggestions for improving mine are more than welcome!
CHECK OUT MY EBAY LISTINGS
 
|
Wednesday, May 18, 2011
Wednesday, May 11, 2011
Shipping Pricing Tips for eBay, Part I
Click here to take a look at my eBay listings
When selling on eBay, your shipping cost accuracy can make or break you. Avoid beginner mistakes and save money by using these tips. This is two-part post. In part one, I'll give you information on estimating shipping and how to put it in your listing. In part two, we'll discuss the process of shipping after the auction.
It's extremely helpful to gather a scale and the packing materials that will work for your item.
The scale could be a kitchen scale or postal scale. Just make sure it's large enough to hold your item. If you are listing a smaller item, your scale should measure down to the ounce.
If you are listing a smaller item, a padded envelope works great. Try not to make the package significantly larger than the item itself. Use your judgement and include more room and packing materials for more delicate items. When I am listing jewelry, I'll typically put it in a small ziplock, then a small jewelry box if I have it, and put that in a padded envelope. Sometimes I'll wrap bubble wrap around the box or bag. I rarely, if ever, buy materials for packing. When I need packing materials, I put out a request on my local Freecycle. All my friends and family know to save packaging for me. Obviously, if you're not looking to make a business out of it, you probably don't need to go to these lengths!
While you are listing your item: when you get to the part to determine shipping costs, go up to the top of the screen and click "Save for Later" so you can focus on the shipping part. This also ensures you don't lose your listing should you lose your internet connection. Pack your item as though you are going to ship it. I know, it's a pain and you may just want to get your item listed, but 1) it will save you time when it's time to ship, and 2) you need to do this to accurately calculate your shipping cost.
Don't tape up the item in case you need to access it to answer questions. Weigh the item. I like to note somewhere on the box or envelope the item name and weight. I usually put it where it will be covered up by the shipping label.
I pretty much always use calculated shipping. There are exceptions, but I'll just deal with calculated for this post. The list below will help you determine what type of postage you should use for shipping within the U.S.:
The most important things to take away are to pack the item as though you are shipping it and weigh the item. Measure the package and input the dimensions if it's larger. Ta 'til next time!
When selling on eBay, your shipping cost accuracy can make or break you. Avoid beginner mistakes and save money by using these tips. This is two-part post. In part one, I'll give you information on estimating shipping and how to put it in your listing. In part two, we'll discuss the process of shipping after the auction.
It's extremely helpful to gather a scale and the packing materials that will work for your item.
The scale could be a kitchen scale or postal scale. Just make sure it's large enough to hold your item. If you are listing a smaller item, your scale should measure down to the ounce.
If you are listing a smaller item, a padded envelope works great. Try not to make the package significantly larger than the item itself. Use your judgement and include more room and packing materials for more delicate items. When I am listing jewelry, I'll typically put it in a small ziplock, then a small jewelry box if I have it, and put that in a padded envelope. Sometimes I'll wrap bubble wrap around the box or bag. I rarely, if ever, buy materials for packing. When I need packing materials, I put out a request on my local Freecycle. All my friends and family know to save packaging for me. Obviously, if you're not looking to make a business out of it, you probably don't need to go to these lengths!
While you are listing your item: when you get to the part to determine shipping costs, go up to the top of the screen and click "Save for Later" so you can focus on the shipping part. This also ensures you don't lose your listing should you lose your internet connection. Pack your item as though you are going to ship it. I know, it's a pain and you may just want to get your item listed, but 1) it will save you time when it's time to ship, and 2) you need to do this to accurately calculate your shipping cost.
Don't tape up the item in case you need to access it to answer questions. Weigh the item. I like to note somewhere on the box or envelope the item name and weight. I usually put it where it will be covered up by the shipping label.
I pretty much always use calculated shipping. There are exceptions, but I'll just deal with calculated for this post. The list below will help you determine what type of postage you should use for shipping within the U.S.:
- 13 oz and under: use Package, and First Class with delivery confirmation. You'll want to add the 19 cents charge in the handling cost. I have a note in my description that tells my buyer that I'm adding 19 cents for delivery confirmation.
- over 13 oz: use Package again, but use Parcel Post with delivery confirmation. Occasionally, Priority will be cheaper than Parcel Post. If your item is very heavy but small, you might want to compare pricing for a small Priority Flat Rate Box or envelope.
The most important things to take away are to pack the item as though you are shipping it and weigh the item. Measure the package and input the dimensions if it's larger. Ta 'til next time!
Tuesday, May 10, 2011
Lessons Learned - The Value of Good Photos on Ebay
 |
| A Decent Photo, In my opinion |
I got lazy for a minute. Okay, this isn't the first time. And the story I'm about to tell you doesn't really prove anything, but I thought it was interesting and could warrant further research if it wasn't such a "duh" revelation.
On Thursday, I took pics of the earrings and necklace you see here and wasn't completely happy with them, but was tired by the end of the day. I posted what I had and let go. My two scheduled auctions came up Sunday evening and I admit I cringed when I looked at the original photo.
Mostly, if I've picked good items (and you can't really miss with fine jewelry, as long is it's not too fancy), I should see bids on the item by the end of the day Monday. With fine jewelry, it's usually sooner. I got a few bids on the sterling bracelet lot I listed, but none on this gold and pearl lot.
I said in my head, "that picture cannot be helping my cause". So, although I really didn't want to do it, I thought for a minute about how I could improve the picture and decided to re-take the photos. The original pictures were on white, which I felt actually in the closeups brought out the luminescence, depth, and color of the pearls. However, when pulled back, it was just white on white, and way too small.
I wanted to keep some of the white background pictures but I thought the overall picture would pop more if I did new pictures on darker background, so I chose this relatively subdued blue. I also decided that any picture including the entire necklace would just not look good. Spread the whole thing out, and it's so thin and delicate that it just gets lost. Bunch it up and it looks like a mess. I settled by including the feature of the necklace (the three seed pearls), then showing the clasp and remaining chain in later pictures.
I still wasn't extremely happy with the way the larger pearls weren't very sharp, but there comes a point of diminishing returns when you obsess too much about perfect photography with Ebay. There are also some really nice shots of the pearls on the white background as well. So I was satisfied and posted the new pictures. No kidding, I got a bid on this item about 15 minutes later. As they say, "Correlation doesn't equal causation.", but I'd rather play it safe here.
I guess one thing I can get out of this experience, besides the obvious (have a good picture!), is that it's more important to have a picture that grabs the attention of the buyer than to show the entire item.
By the way, here's the original picture:

Please don't tell anyone. Although I think it's stuck on my Auctiva scroll :)
Friday, April 29, 2011
Friday Fun Links
Check out my Ebay auctions!
Friday is the day I share links, Ebay related or not. Here are my favorites from the week.
First of all I want these shoes! I just don't have it in my budget to buy 'em!
I just discovered Couroc trays a few weeks ago when I found a few at the warehouse. This Ebay guide has lots of cool pics and a brief history of Couroc trays.
My favorite vintage maven, Super Kawaii Mama, does a fabulous job of glamming up gals retro style and proves it right here.
That's all I have, enjoy your weekend!
Wednesday, April 27, 2011
Taking Pictures of Small or Difficult Marks
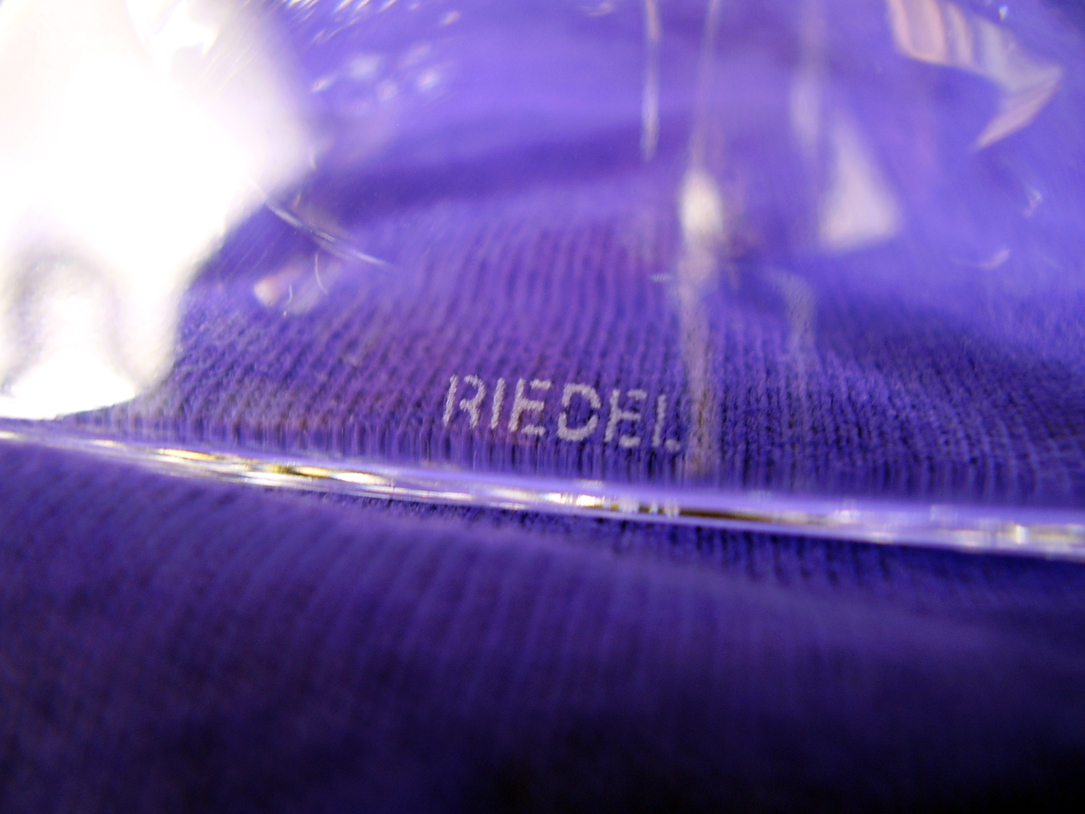 |
| Markings on Glass can be Difficult |
It can be difficult to capture some markings on jewelry, glass, and porcelain since they are usually etched or engraved very small and with little color differentiation. Putting images of these marks on your listings will give buyers the confidence to bid on your Ebay items instead of passing you over. I'll give you a few tips that should help you get these markings in most situations.
The first absolutely essential is to use the macro or super macro mode on your camera. Take a look at your user manual or play around with the camera to find the setting. On my cameras, it's indicated with a flower symbol. Your manual will also help you figure out the distance for which you need to use the macro setting in order for the camera to focus.
Most digital cameras should have this feature, even the basic models. I have a digital SLR as one of my cameras, but it's older and needs a special lens to get really close, so this is where the manual will come in handy as to letting you know if your camera is capable.
The next thing you must do is gather lots of light. If it's nice outside, that's a great place to take pictures. Otherwise, since the area you're working with is small, you should be able to gather enough lamps together and point them at the same place. Studio in a box works well, but you still may need an additional lamp.

If what you're shooting is clear (like the glass picture above), you'll want a background that pops the marking. In this case, I used a purple t-shirt. White probably would not have worked, and a really dark color could have make the marking darker. If you're just starting out, try a few different fabrics or paper to see what works.
You can use a tripod to keep the camera steady, but I find it's not really necessary if you have enough light. It's best not to use zoom when you are first starting out because it will alter the resolution of the image. You might decide to use it later after you get more experienced, but initially you just get as close to the item as you can. Most digital cameras have you push the shutter button halfway to focus (make sure you're using auto focus) and will beep or otherwise indicate you've successfully focused. If the camera will not focus, try backing off a little and see if that helps, you may be out of the range of possible distance. Keep backing off until the camera focuses. Once you get a lock on the item, finish taking the picture. You might want to take a couple more at this point.
Sometimes you are dealing with very light markings that the camera's auto focus doesn't pick up. In this case, I'll take a little piece of paper with typing or dark writing on it and put it in front of the mark (make sure the paper is actually touching the object), focus the camera, then remove the piece of paper. Make sure the piece of paper doesn't take up the entire frame or else the brightness of the final picture may end up being too dark.

If I can get a picture of the item in focus, but it's just too vague, I may sharpen and enhance the contrast a bit in Photoshop (or whatever your image editing software of choice is). When I do this I will disclose in the listing that the marking was enhanced to make it more visible.
And sometimes, although I hate showing off my bad (or nonexistent) manicure, I hold the item so I can angle it to the light to make the marking stand out. I try to keep as little of my hand out of the picture as possible. Obviously, I didn't do a great job of in this example.
Hope this helps and please feel free to share your tips as well!
Monday, April 25, 2011
Single Earrings Sitting in a Jewelry Box?
 |
| Gold & Pearl Single Earrings |
Hey everybody, If you think your single earrings are worthless, you'll find that there are many applications for these beauties. This picture contains some really pretty pearls along with some gold filigree and enameling that are just too good to scrap. People buy single earrings to make them into necklaces (easily done by adding jump rings to the sides and attaching a chain) or disassemble and use for other jewelry.
These particular earrings are all 14 karat gold with pearls (and of course, the enameling on the one earring). They sold for $151.49 on Ebay. So, not junk, right?
If you decide to sell your craft (or sadly, as some will view it, scrap) jewelry on Ebay, here some tips that should get you maximum dollar:
- First the obvious advice. Take clear pictures of the front and back in adequate lighting. If you don't have good lighting for taking pics in your house, take them outside on a moderately bright day, sometime before or after noon. Use a plain background unless you really know what you're doing.
- In your title, you want to cram as many search words in as you can while still making sense. In this case, you want to attract people who will buy the jewelry for crafting or scrap. People will probably be searching specifically for gold. This is the title I came up with for this lot: 14K Yellow Gold & Pearl Craft Scrap Single Earring Lot. You can also search completed listings on Ebay for ideas (you must have an account to do this). Just make sure you get ideas from items that sold well :).
- Take a picture of the jewelry on a scale. If there are any gold-only items, you should take another picture of the gold-only items on the scale. Your buyers don't know you, therefore you have to provide evidence that you are trustworthy.
- Use your macro setting on your camera if you have it to take pictures of any designer, maker, or (probably most importantly), gold content markings. Whether or not you are able to get pictures of the markings, list every single marking on your listing. It can be difficult to take pictures of those tiny marks. I'll share in another post some tips for taking pics of tiny and hard to see markings.
Of course, I'm always happy to sell or teach you to sell your stuff for you as well. Just contact me at marija@nazaza.com.
Thursday, April 21, 2011
Hello from Nazaza's Finer Things

Mary Hoyer Doll
This is my first post for Nazaza's Finer Things. I am a collectibles, vintage, and antique dealer specializing in consignments and training folks to sell their own stuff on Ebay or through other venues. One of the things I love about doing this is the sheer variety of stuff that I come across. I also relish finding a home for forgotten items, and items needing TLC to be restored to their former glory!
This is my first post for Nazaza's Finer Things. I am a collectibles, vintage, and antique dealer specializing in consignments and training folks to sell their own stuff on Ebay or through other venues. One of the things I love about doing this is the sheer variety of stuff that I come across. I also relish finding a home for forgotten items, and items needing TLC to be restored to their former glory!
I'll be heading to "the warehouse" here shortly to see what kinds of goodies they have in store for me! I'll explain about the warehouse in a future post.
I'll leave it at that for now. I look forward to sharing my experiences with you!
Subscribe to:
Posts (Atom)